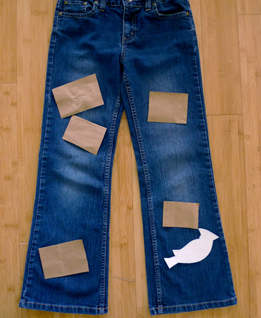
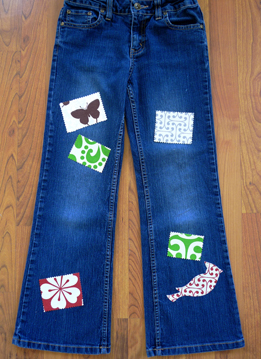
Hello Fancy Pants! It’s fashiongirl. Hope everyone had a swell holiday. CherryBlossem recently suggested I do a post on how to make a pair of patched jeans like Birdie’s…
So pull out a pair of comfy, old jeans and let’s get started!
Materials
- + jeans
- + fabric for patches
- + scissors
- + iron
- + double-sided steam adhesive (pick up at craft store)
- + needle
- + thread in fun colors
Step 1: Lay out your design. Make some “paper patterns” of your patches using scrap paper—cut out different sizes and shapes and move them around until you get a look you like. I say keep it simple—3 to 6 patches in basic shapes (will make them easier to sew.)

Step 2: Prep your patches. Gather some fun fabric and pick a pattern for each patch design. I recommend a medium weight cotton cloth like canvas. Also, be sure the fabric has been washed/pre-shrunk before using it. I chose some amazing swatches from Mod Green Pod—they’re beautiful and organic! (see end of post for scoop on these fab folks.)
Step 3: Pop open the packet of double-sided steam adhesive sheets. These are available at most craft or fabric stores. Make sure you buy the heavy-duty stuff (made for use with denim and canvas) and read the directions carefully.

Step 4: Making a simple square patch (Part 1). Lay your square “paper pattern” on the fabric, trace and cut. Next, lay the fabric patch on the adhesive sheet. Make sure you place the fabric on top of the “tracing” side (the side without the “web” texture). Trace, cut and then peel away the top sheet. You should now have a matching piece of adhesive the same size as your fabric.

Step 5: Making a simple square patch (part 2). Put the two pieces together like a sandwich, with the underside of the fabric and the web side of the adhesive against one another. On a safe surface, get your iron nice and hot and press the patch pieces together. Again, follow the directions on the adhesive packet – since time and temp may vary. Once that’s done, peel the paper off and…
Step 6: Viola! you have a lovely fabric patch. If you like, you can use pinking shears to add a texture to the edge. Then it’s all ready for you to iron on your jeans (…or a cotton bag, or t-shirt, etc!)


Step 7: Making a fancy patch. Follow the steps above, starting with a piece of fabric and adhesive sheet that is large enough to accommodate your design. Use your paper pattern to trace it onto the “tracing side” of the paper then iron the fabric and sheet together as described above. Cut along the outline of your design, peel off the backing and you’re ready to iron.


Step 8: Iron and stitch. Repeat! Once you’ve got you patch ironed on—it’s time to stitch it down. For those of you who know how to sew, just thread a needle with some thread, double it up and tie a knot. Start from the inside of the jeans and do a running stitch close to the edges of each patch. Finish up with a good strong knot on the inside and move on to the next patch…

Step 9: Stay Tuned for Basic Sewing Lesson! For those of you who don’t know how to sew, no worries—just catch next week’s post. I’ll be offering a basic sewing lesson so you can get your jeans all stitched up and ready to rock for the holidays!!!

Tips
- + Place your patches on the less bendy parts of your jeans (unless you have a hole, of course!) Top of thigh and below knee works well.
- + Once you’ve got your patches all sewn up, turn your jeans inside out when you wash them. It will help patches stay strong and in place.
- + You have to sew down the edges, otherwise your patch may come off or curl up (this goes for jeans and anything else you “applique”
- + Edges of patches will fray a little bit over time–it’s a good look!
- + Check out the amazing organic fabric I picked up at www.modgreenpod.com—nice people + awesome designs and colors!
- + Big shout out to Ellen for super-creative suggestions!
THANKS! I shall send birdie links for other stuff to post. I already sew, but to everyone who doesn’t it changed my life! OK, so it changed my clothes and my bedroom, bt still. It’s a great skill!
when i did it too my pants it was first relly hard . but after a bit more of doing it it was very easy. put now i got a snazzy look for my pants
😉