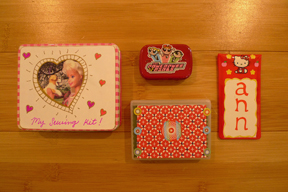
Hello Everyone! Here’s an overview of the basic stuff you need to get started hand-sewing. If you would like to learn, the holidays will be a great time to give it a whirl!
Let’s do this in two parts: first sewing kit, then a link to a fab sewing site that offers basic lessons…
Part 1: Mini-Sewing Kit. You don’t need a whole lot to get started. In fact, these little kits are so easy to put together, they make great gifts for friends and fam, too!
- Materials
- + Little container for each kit
- + Needles
- + Scrap of felt, flannel or other medium-weight fabric
- + Thread
- + Card stock or bobbins for wrapping thread
- + Scissors
- + Stuff to decorate kits with – paint pens, stickers, cool paper, etc.
Step 1: Find a cool container. Use little mint and candy tins, Q-tip and Band-aid boxes or sturdy plastic sleeves. Tip: Look for something that safely stores needles and closes securely!
Step 2: Gather needles and fabric scraps.
Needles – Ask a parent, relative or friend if they have a couple of sewing needles to spare. Most folks keep them around to sew on loose buttons. Or have a traveler pick up an extra hotel sewing kit. These are usually free, tiny, and come in a little matchbook along with thread. Otherwise, you can pick up some needles at the craft or fabric store.
Fabric – Cut the fabric to fit the inside of your container. This scrap is going to be your needle-holder. Carefully poke the needles in and out of the fabric so they stay in place. (If you have pins and are comfortable using them, store a few along with your needles.)
Step 3: Gather different colors and lengths of thread. Like the needles, ask around–there may be some in the house already…
Card – If your kit is tiny, the best way to store thread is to wrap it around a little piece of card stock. Cut it to fit inside your kit, then cut little slots along the top and bottom. Wrap your thread so it sits in the grooves.
Bobbins – If you know someone with a sewing machine and have space in your kit, ask for bobbins to wind your thread on. If you’re lucky, they may give you some threaded extras they have on hand.
Step 4: Putting it all together. Load up your kit. If you’ve got space, you can add a thimble (protects your finger when pushing a needle through thick fabric), a little measuring tape and even a tiny pair of scissors for trimming threads. I recommend getting a pair of larger scissors for cutting fabric. Tip: Use these scissors only for fabric, never use them for paper–dulls the blades.
Step 5: Decorate! Make it all your own (or special for someone else!) using paint pens, sticker paper and stickers, markers, etc.
- Tips
- + Be careful when working with needles, pins and scissors–be patient and take your time.
- + Always put away your needles, pins and scissors properly after using them.
- + If you want to “Sew on the Go”: Keep your latest project in a little canvas bag, then toss in your mini-sewing kit and scissors. Hang on a doorknob (or a safe place if you have little sibs around) and you are ready to roll!
Part 2: Now for the “Lesson”…
Take a look at www.kids-sewing-projects.com. This wonderful site offers sewing lessons and projects for kids at all different levels and ages. It’s also got great videos for beginners, such as threading a needle and making a knot to basic hand stitches and tasks–like making a hem and sewing on a button. Look along the left side of the home page and select your sewing level. Then you will get clear instructions and practice projects to help build your skills!
Videos on basic hand stitches: www.kids-sewing-projects.com/basic-hand-sewing-stitches (move down the page.)
Enjoy! I’ll be back soon–and we’ll get started on some holiday fashions that I promise are sew cool!!!


Hi,Jan it is cool you can swoe.sophia sopher
Yay! I’m so exited to learn how to sew! Thanks for posting these crafts and ideas!
my mom plans to teach me cn’t wait and thx FGA