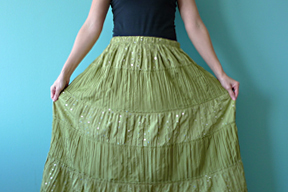
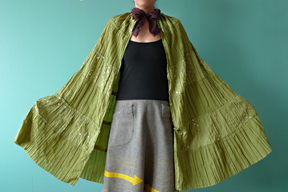
A fun cape or capelet adds magic to any outfit, especially during the holidays! You don’t need a super-fancy occasion or english accent to rock this look–just an old skirt and an adventurous attitude…
- Materials
- + Full skirt with elastic waistband
- + Masking tape and pins
- + Needle
- + Thread
- + Pencil
- + Ruler or yardstick
- + Scissors
- + Ribbon
- + Safety pin or Bobby pin
Step 1: Pick out a large, full skirt with an elastic waistband (the elastic should sit inside a little sleeve that goes around the waist.) A drawstring skirt also works. Long skirts will give you an elegant cape, short ones make cute little capelets–throw it over your head to get an idea of how it will fall. Look for skirts with fancy fabrics and sparkles, anything that catches your eye!

picked up at the thrifty for $4.99, yay!
Step 2: Prep your skirt and cut it open. Lay skirt out on work area. Carefully cut away any lining, without cutting into the waistband. Mark the skirt straight up the front and cut open along the center line. An easy way to do this: mark middle of waistband and middle of bottom hem, then lay a piece of masking tape between them. Draw a line down the center of your tape and cut (be sure to cut only front side.)


Step 3: Gently pull out the elastic. Carefully cut away at any thread or labels that don’t let it slip out smoothly.
Step 4: Prep the hem for sewing. Fold the edge back about 1/2 inch and pin into place.

Step 5: Sew hem. Make knot and begin stitch 1/4 inch below the waistband (marked in pic below). Use a running stitch by gathering little folds of fabric and pushing your needle through them. Little folds = little stitches. Enjoy taking your time! Keep at it until you hit the bottom of skirt, then sew a knot and do it all again on other side. (don’t forget to remove or cut off tape)

Step 6: Finish up the collar. Take the extra fabric at the opening of the waistband (now the collar) and tuck it back into the sleeve until the edge of the opening lines up with the new hem. If you are working with a heavy fabric, you may want to cut off a little bit of excess before tucking it in. Once that’s done, sew a couple of stitches at the base of the opening, so the fabric stays in place.

Tuck in edges, then sew a few stitches to keep in place.
Step 7: Make your tie. Pick a beautiful ribbon or cord to run through the collar sleeve. Attach end of ribbon to safety pin (or wrap around a bobby pin) and gently pull it though sleeve by bunching up the fabric, until it comes out through the opposite end.

Step 8: Fabulousness!!! Throw your cape over your shoulders, tie your ribbon in a fancy bow and check yourself out! Dress it down with tee, pair of old jeans and sneaks, or go holiday super-hero with cool dress and boots…

fab…

…ola!!!
- Tips
- + For a sturdier hem and no fray–remove tape, fold edge over twice, then pin and sew.
- + Other hem options: running through sewing machine or use hem tape and iron for no-sew.
- + Large or XL skirts can = 2 small capes.
- + Different skirts will result in dif styles – try t-shirt material (straight cut, no-sew!) or something tweedy for a sherlock holmes or Jedi look.
- + Play!


