Share Gratitude & Generosity this week

Gratitude Cards
“I recognize all I receive from others.”

As a fairy godmothers in-the-making, you can practice gratitude by first noticing all the things others do for you, then showing your appreciation with handmade gratitude cards. Learn how in this Wisdom Act:

Gratitude Card

Click to earn this beautiful Wisdom Card today!


Green Squad: Food for Neighbors in Need
“Share food with others and decorate cool recycled bags!”

Granny Mo will tell you: good food from the garden tastes best when shared. Share the bounty by organizing a food drive close to home! And protect the green world, too—deliver your donations in reusable bags that you’ve decorated yourself.Get started now: it’s fun, easy and makes a real difference.

Green Squad Wisdom Card

Click to earn this beautiful Wisdom Card today!


Check out lots more Wisdom Acts at the Wisdom Chooser.

Don’t forget to Buy Birdie’s Book for the tween girl in your life!

Have you started YOUR Local Lineage?

Local Lineage: Green Squad
Together we can heal the world.

As a fairy-godmother-in-training, you don’t have to wait to go to Aventurine to start growing in wisdom. You can make a difference in the real world —your world — every day. How? Form a local lineage with friends to make your world a better place! Get started now: it’s fun, easy and makes a real difference.


Local Lineage Green Squad

Click to earn this beautiful Wisdom Card today!

Branch of Blessings
I gather blessings with those I love.

What do you feel most grateful for? When you look around the green world it’s easy to give thanks for the sun, the trees, and the even the rain! Make a branch of blessings to show that you appreciate all the gifts in your life. Learn how in this Wisdom Act:


Branch of Blessings

Click to earn this beautiful Wisdom Card today!

More Wisdom Acts…


Wisdom Cards

Click to explore the beautiful cards and pick another adventure for today!

Don’t forget to Buy Birdie’s Book for the tween girl in your life!

Family Wisdoms and My Glimmer Tree

Family Wisdoms
We grow from our family trees.

Our families are the roots from which we grow. Although we all blossom in different ways, we can find support in our lineage. Interview a family member and discover your family’s wisdom! Do this Wisdom Act with your fam today!

Family Wisdoms Card

Click to earn this beautiful Wisdom Card today!


My Glimmer Tree
Find your Glimmer Tree and share it with a friend!

Birdie hugs the Glimmer Tree when she meets it for the first time. How do you honor trees in real life? You decide, share an adventure with a friend, and grow in the Wisdom of the Arbor Lineage! Learn how in this Wisdom Act:

Glimmer Tree Wisdom Card

Click to earn this beautiful Wisdom Card today!


Check out lots more Wisdom Acts at the Wisdom Chooser.

DIY Fashion Friday: Fabulous Capes!

A fun cape or capelet adds magic to any outfit, especially during the holidays! You don’t need a super-fancy occasion or english accent to rock this look–just an old skirt and an adventurous attitude…

  • Materials
  • + Full skirt with elastic waistband
  • + Masking tape and pins
  • + Needle
  • + Thread
  • + Pencil
  • + Ruler or yardstick
  • + Scissors
  • + Ribbon
  • + Safety pin or Bobby pin

Step 1: Pick out a large, full skirt with an elastic waistband (the elastic should sit inside a little sleeve that goes around the waist.) A drawstring skirt also works. Long skirts will give you an elegant cape, short ones make cute little capelets–throw it over your head to get an idea of how it will fall. Look for skirts with fancy fabrics and sparkles, anything that catches your eye!
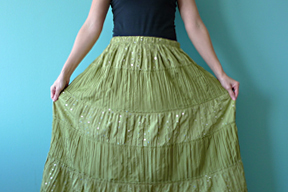
picked mine up at the thrifty for $5, yay!

picked up at the thrifty for $4.99, yay!

Step 2: Prep your skirt and cut it open. Lay skirt out on work area. Carefully cut away any lining, without cutting into the waistband. Mark the skirt straight up the front and cut open along the center line. An easy way to do this: mark middle of waistband and middle of bottom hem, then lay a piece of masking tape between them. Draw a line down the center of your tape and cut (be sure to cut only front side.)

Cape_IMG1Cape_IMG2

Step 3: Gently pull out the elastic. Carefully cut away at any thread or labels that don’t let it slip out smoothly.

Step 4: Prep the hem for sewing. Fold the edge back about 1/2 inch and pin into place.

Cape_IMG3

Step 5: Sew hem. Make knot and begin stitch 1/4 inch below the waistband (marked in pic below). Use a running stitch by gathering little folds of fabric and pushing your needle through them. Little folds = little stitches. Enjoy taking your time! Keep at it until you hit the bottom of skirt, then sew a knot and do it all again on other side. (don’t forget to remove or cut off tape)

Cape_IMG4

Step 6: Finish up the collar. Take the extra fabric at the opening of the waistband (now the collar) and tuck it back into the sleeve until the edge of the opening lines up with the new hem. If you are working with a heavy fabric, you may want to cut off a little bit of excess before tucking it in. Once that’s done, sew a couple of stitches at the base of the opening, so the fabric stays in place.

Tuck in edges, then sew a few stitches to keep in place.

Tuck in edges, then sew a few stitches to keep in place.

Step 7: Make your tie. Pick a beautiful ribbon or cord to run through the collar sleeve. Attach end of ribbon to safety pin (or wrap around a bobby pin) and gently pull it though sleeve by bunching up the fabric, until it comes out through the opposite end.

Cape_IMG6

Step 8: Fabulousness!!! Throw your cape over your shoulders, tie your ribbon in a fancy bow and check yourself out! Dress it down with tee, pair of old jeans and sneaks, or go holiday super-hero with cool dress and boots…

Cape_IMG7A

fab…

...ola!!!

…ola!!!

  • Tips
  • + For a sturdier hem and no fray–remove tape, fold edge over twice, then pin and sew.
  • + Other hem options: running through sewing machine or use hem tape and iron for no-sew.
  • + Large or XL skirts can = 2 small capes.
  • + Different skirts will result in dif styles – try t-shirt material (straight cut, no-sew!) or something tweedy for a sherlock holmes or Jedi look.
  • + Play!

DIY Fashion Friday: Masks

So this week I tried making a mask for my Halloween costume. It was pretty fun, so I made a couple of them. It’s not too late to make your own…hint, hint.

painted paper bag mask
two masks made from store-bought masks

Step 1: Make it!

Store-bought Mask: Find a mask at a resale or craft store or recycle one you already have. To change the shape, put the mask on in front of the mirror, mark it with a pen, then trim with scissors.

Handmade Mask: You can cut out a mask from a paper bag, craft paper or foam. Or you can use tin foil. Fold over several layers of heavy foil, press it tightly to your face, mark the shape and the eyeholes with a marker, and then trim. You can decorate the foil or use it as a base for paper maché.

Paper bags and tin foil are also cool because you’re recycling. Continue reading